TusPHP






Resumable file upload in PHP using tus resumable upload protocol v1.0.0

Medium Article ⚡ Laravel & Lumen Integration ⚡ Symfony Integration ⚡ CakePHP Integration ⚡ WordPress Integration
**tus** is a HTTP based protocol for resumable file uploads. Resumable means you can carry on where you left off without
re-uploading whole data again in case of any interruptions. An interruption may happen willingly if the user wants
to pause, or by accident in case of a network issue or server outage.
### Table of Contents
* [Installation](#installation)
* [Usage](#usage)
* [Server](#server)
* [Nginx](#nginx)
* [Apache](#apache)
* [Client](#client)
* [Third Party Client Libraries](#third-party-client-libraries)
* [Extension support](#extension-support)
* [Expiration](#expiration)
* [Concatenation](#concatenation)
* [Events](#events)
* [Responding to an Event](#responding-to-an-event)
* [Middleware](#middleware)
* [Creating a Middleware](#creating-a-middleware)
* [Adding a Middleware](#adding-a-middleware)
* [Skipping a Middleware](#skipping-a-middleware)
* [Setting up a dev environment and/or running examples locally](#setting-up-a-dev-environment-andor-running-examples-locally)
* [Docker](#docker)
* [Kubernetes with minikube](#kubernetes-with-minikube)
* [Contributing](#contributing)
* [Questions about this project?](#questions-about-this-project)
* [Supporters](#supporters)
### Installation
Pull the package via composer.
```shell
$ composer require ankitpokhrel/tus-php
```
### Usage
| 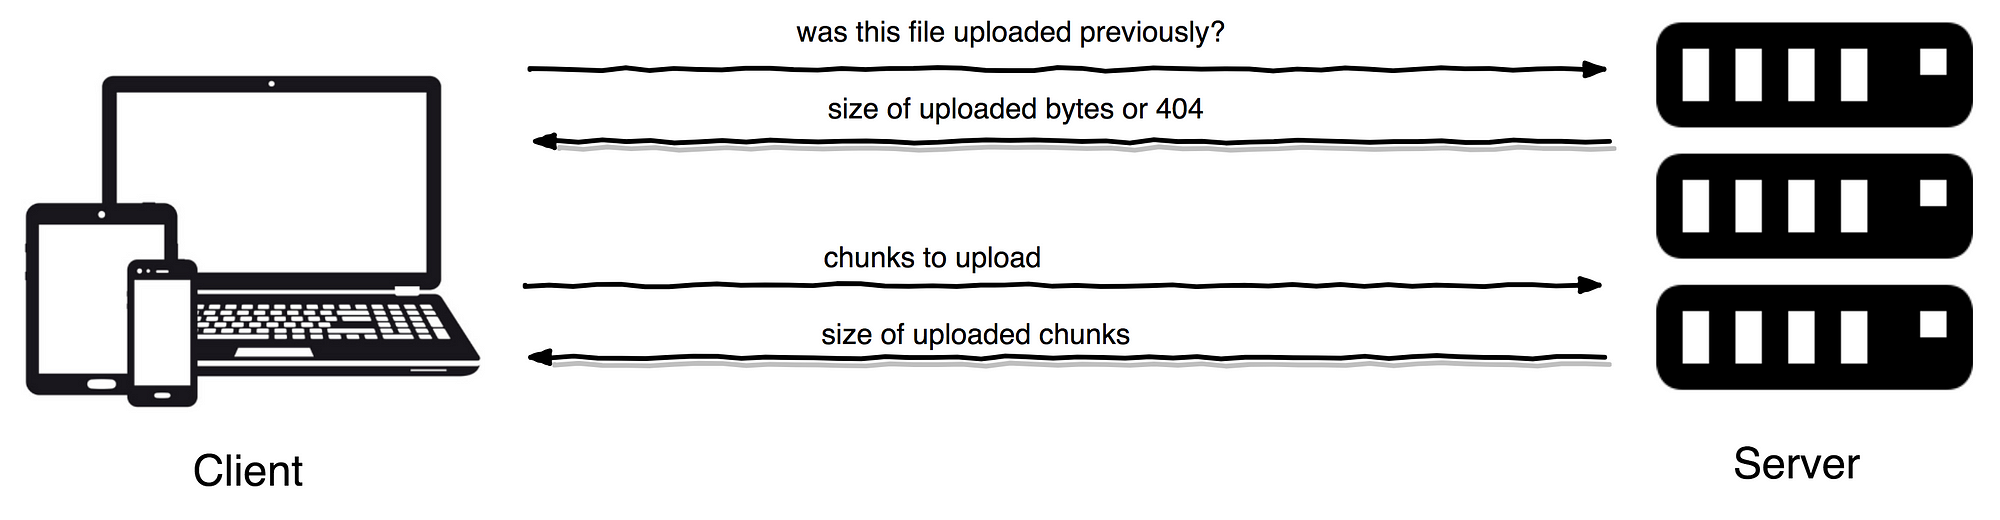 |
|:--:|
| Basic Tus Architecture |
#### Server
This is how a simple server looks like.
```php
// server.php
$server = new \TusPhp\Tus\Server('redis'); // Leave empty for file based cache
$response = $server->serve();
$response->send();
exit(0); // Exit from current PHP process.
```
You need to rewrite your server to respond to a specific endpoint. For example:
###### Nginx
```nginx
# nginx.conf
location /files {
try_files $uri $uri/ /server.php?$query_string;
}
```
###### Apache
```apache
# .htaccess
RewriteEngine on
RewriteCond %{REQUEST_FILENAME} !-f
RewriteRule ^files/?(.*)?$ /server.php?$1 [QSA,L]
```
Default max upload size is 0 which means there is no restriction. You can set max upload size as described below.
```php
$server->setMaxUploadSize(100000000); // 100 MB in bytes
```
Default redis and file configuration for server and client can be found inside `config/server.php` and `config/client.php` respectively.
To override default config you can simply copy the file to your preferred location and update the parameters. You then need to set the config before doing anything else.
```
\TusPhp\Config::set();
$server = new \TusPhp\Tus\Server('redis');
```
Alternately, you can set `REDIS_HOST`, `REDIS_PORT` and `REDIS_DB` env in your server to override redis settings for both server and client.
#### Client
The client can be used for creating, resuming and/or deleting uploads.
```php
$client = new \TusPhp\Tus\Client($baseUrl);
// Optional. If key is not set explicitly, the system will generate an unique uuid.
$key = 'your unique key';
$client->setKey($key)->file('/path/to/file', 'filename.ext');
// Create and upload a chunk of 1MB
$bytesUploaded = $client->upload(1000000);
// Resume, $bytesUploaded = 2MB
$bytesUploaded = $client->upload(1000000);
// To upload whole file, skip length param
$client->file('/path/to/file', 'filename.ext')->upload();
```
To check if the file was partially uploaded before, you can use `getOffset` method. It returns false if the upload
isn't there or invalid, returns total bytes uploaded otherwise.
```php
$offset = $client->getOffset(); // 2000000 bytes or 2MB
```
Delete partial upload from the cache.
```php
$client->delete($key);
```
By default, the client uses `/files` as an API path. You can change it with `setApiPath` method.
```php
$client->setApiPath('/api');
```
By default, the server will use `sha256` algorithm to verify the integrity of the upload. If you want to use a different hash algorithm, you can do so by
using `setChecksumAlgorithm` method. To get the list of supported hash algorithms, you can send `OPTIONS` request to the server.
```php
$client->setChecksumAlgorithm('crc32');
```
#### Third Party Client Libraries
##### [Uppy](https://uppy.io/)
Uppy is a sleek, modular file uploader plugin developed by same folks behind tus protocol.
You can use uppy to seamlessly integrate official [tus-js-client](https://github.com/tus/tus-js-client) with tus-php server.
Check out more details in [uppy docs](https://uppy.io/docs/tus/).
```js
uppy.use(Tus, {
endpoint: 'https://tus-server.yoursite.com/files/', // use your tus endpoint here
resume: true,
autoRetry: true,
retryDelays: [0, 1000, 3000, 5000]
})
```
##### [Tus-JS-Client](https://github.com/tus/tus-js-client)
Tus-php server is compatible with the official [tus-js-client](https://github.com/tus/tus-js-client) Javascript library.
```js
var upload = new tus.Upload(file, {
endpoint: "/tus",
retryDelays: [0, 3000, 5000, 10000, 20000],
metadata: {
name: file.name,
type: file.type
}
})
upload.start()
```
### Extension Support
- [x] The Creation extension is mostly implemented and is used for creating the upload. Deferring the upload's length is not possible at the moment.
- [x] The Termination extension is implemented which is used to terminate completed and unfinished uploads allowing the Server to free up used resources.
- [x] The Checksum extension is implemented, the server will use `sha256` algorithm by default to verify the upload.
- [x] The Expiration extension is implemented, details below.
- [x] This Concatenation extension is implemented except that the server is not capable of handling unfinished concatenation.
#### Expiration
The Server is capable of removing expired but unfinished uploads. You can use the following command manually or in a cron job to remove them.
```shell
$ ./vendor/bin/tus tus:expired --help
Usage:
tus:expired [] [options]
Arguments:
cache-adapter Cache adapter to use, redis or file. Optional, defaults to file based cache. [default: "file"]
Options:
-c, --config=CONFIG File to get config parameters from.
eg:
$ ./vendor/bin/tus tus:expired redis
Cleaning server resources
=========================
1. Deleted 1535888128_35094.jpg from /var/www/uploads
```
You can use`--config` option to override default redis or file configuration.
```shell
$ ./vendor/bin/tus tus:expired redis --config=
```
#### Concatenation
The Server is capable of concatenating multiple uploads into a single one enabling Clients to perform parallel uploads and to upload non-contiguous chunks.
```php
// Actual file key
$uploadKey = uniqid();
$client->setKey($uploadKey)->file('/path/to/file', 'chunk_a.ext');
// Upload 10000 bytes starting from 1000 bytes
$bytesUploaded = $client->seek(1000)->upload(10000);
$chunkAkey = $client->getKey();
// Upload 1000 bytes starting from 0 bytes
$bytesUploaded = $client->setFileName('chunk_b.ext')->seek(0)->upload(1000);
$chunkBkey = $client->getKey();
// Upload remaining bytes starting from 11000 bytes (10000 + 1000)
$bytesUploaded = $client->setFileName('chunk_c.ext')->seek(11000)->upload();
$chunkCkey = $client->getKey();
// Concatenate partial uploads
$client->setFileName('actual_file.ext')->concat($uploadKey, $chunkBkey, $chunkAkey, $chunkCkey);
```
Additionally, the server will verify checksum against the merged file to make sure that the file is not corrupt.
### Events
Often times, you may want to perform some operation after the upload is complete or created. For example, you may want to crop images after upload or transcode a file and email it to your user.
You can utilize tus events for these operations. Following events are dispatched by server during different point of execution.
| Event Name | Dispatched |
-------------|------------|
| `tus-server.upload.created` | after the upload is created during `POST` request. |
| `tus-server.upload.progress` | after a chunk is uploaded during `PATCH` request. |
| `tus-server.upload.complete` | after the upload is complete and checksum verification is done. |
| `tus-server.upload.merged` | after all partial uploads are merged during concatenation request. |
#### Responding to an Event
To listen to an event, you can simply attach a listener to the event name. An `TusEvent` instance is created and passed to all of the listeners.
```php
$server->event()->addListener('tus-server.upload.complete', function (\TusPhp\Events\TusEvent $event) {
$fileMeta = $event->getFile()->details();
$request = $event->getRequest();
$response = $event->getResponse();
// ...
});
```
or, you can also bind some method of a custom class.
```php
/**
* Listener can be method from any normal class.
*/
class SomeClass
{
public function postUploadOperation(\TusPhp\Events\TusEvent $event)
{
// ...
}
}
$listener = new SomeClass();
$server->event()->addListener('tus-server.upload.complete', [$listener, 'postUploadOperation']);
```
### Middleware
You can manipulate request and response of a server using a middleware. Middleware can be used to run a piece of code before a server calls the actual handle method.
You can use middleware to authenticate a request, handle CORS, whitelist/blacklist an IP etc.
#### Creating a Middleware
In order to create a middleware, you need to implement `TusMiddleware` interface. The handle method provides request and response object for you to manipulate.
```php
user->isLoggedIn()) {
throw new UnauthorizedHttpException('User not authenticated');
}
$request->getRequest()->headers->set('Authorization', 'Bearer ' . $this->user->token());
}
// ...
}
```
#### Adding a Middleware
To add a middleware, get middleware object from server and simply pass middleware classes.
```php
$server->middleware()->add(Authenticated::class, AnotherMiddleware::class);
```
Or, you can also pass middleware class objects.
```php
$authenticated = new Your\Namespace\Authenticated(new User());
$server->middleware()->add($authenticated);
```
#### Skipping a Middleware
If you wish to skip or ignore any middleware, you can do so by using the `skip` method.
```php
$server->middleware()->skip(Cors::class, AnotherMiddleware::class);
```
### Setting up a dev environment and/or running examples locally
An ajax based example for this implementation can be found in `examples/` folder. You can either build and run it using docker or use kubernetes locally with minikube.
#### Docker
Make sure that [docker](https://docs.docker.com/engine/installation/) and [docker-compose](https://docs.docker.com/compose/install/)
are installed in your system. Then, run docker script from project root.
```shell
$ bin/docker.sh
```
Now, the client can be accessed at http://0.0.0.0:8080 and server can be accessed at http://0.0.0.0:8081. Default API endpoint is set to`/files`
and uploaded files can be found inside `uploads` folder. All docker configs can be found in `docker/` folder.
#### Kubernetes with minikube
Make sure you have [minikube](https://github.com/kubernetes/minikube) and [kubectl](https://kubernetes.io/docs/tasks/tools/install-kubectl/)
are installed in your system. Then, build and spin up containers using k8s script from project root.
```shell
$ bin/k8s.sh
```
The script will set minikube docker env, build all required docker images locally, create kubernetes objects and serve client at port `30020`. After successful build,
the client can be accessed at http://192.168.99.100:30020 and server can be accessed at http://192.168.99.100:30021.
The script will create 1 client replica and 3 server replicas by default. All kubernetes configs can be found inside `k8s/` folder, you can tweak it as required.
You can use another helper script while using minikube to list all uploaded files, login to redis and clear redis cache.
```shell
# List all uploads
$ bin/minikube.sh uploads
# Login to redis
$ bin/minikube.sh redis
# Clear redis cache
$ bin/minikube.sh clear-cache
```
Since the server supports tus expiration extension, a cron job is set to run once a day at midnight to free server resources. You can adjust it as required in `k8s/cron.yml`.
### Contributing
1. Install [PHPUnit](https://phpunit.de/) and [composer](https://getcomposer.org/) if you haven't already.
2. Install dependencies
```shell
$ composer install
```
3. Run tests with phpunit
```shell
$ ./vendor/bin/phpunit
# or
$ composer test
```
4. Validate changes against [PSR2 Coding Standards](http://www.php-fig.org/psr/psr-2/)
```shell
$ composer cs-fixer
# or
$ ./vendor/bin/php-cs-fixer fix --rules=@PSR2,not_operator_with_space,single_quote
```
### Questions about this project?
Please feel free to report any bug found. Pull requests, issues, and project recommendations are more than welcome!
### Supporters
[](https://www.jetbrains.com/?from=ankitpokhrel/tus-php)